Your homelab is humming along. Proxmox running a dozen VMs, a NAS full of media, Then you connect a cheap smart plug or a guest phone to your Wi-Fi, and suddenly you realize every untrusted device on your network can see your hypervisor management interface. That’s the moment most people recognize that their flat wireless network has become a liability.
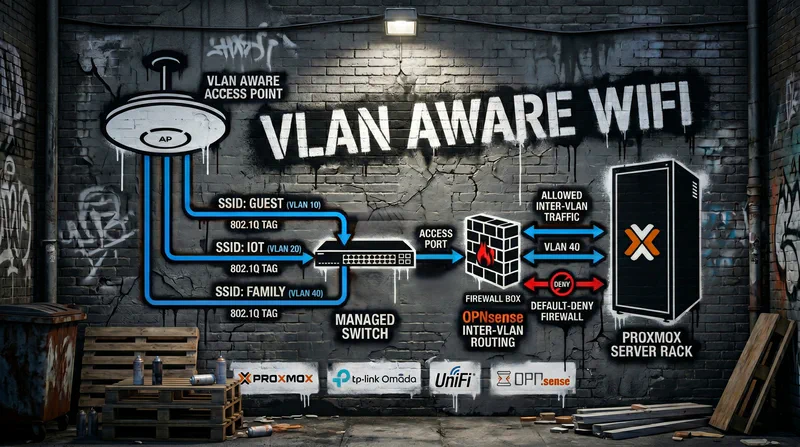
The fix is a VLAN-aware wireless setup: an access point that maps each SSID to its own VLAN, a managed switch that trunks those VLANs, and a router or firewall that enforces who can talk to whom. Get this right and your IoT junk, guest devices, and homelab services live in separate broadcast domains that can’t reach each other unless you explicitly allow it. This guide walks through hardware selection, how a Proxmox VLAN bridge fits in, and deploying the whole stack end to end.
I ran this exact build on my own rack: an OPNsense VM on Proxmox, with a TP-Link TL-SG2008P managed PoE switch, and an Omada EAP610 access points feeding five SSIDs. Everything below is what actually worked, plus the mistakes that cost me an evening.
Why VLAN-Aware Wi-Fi Matters for a Homelab
A flat network treats every device the same. Your laptop, your hypervisor, a $12 Wi-Fi light bulb, and your neighbor’s phone on guest Wi-Fi all sit in one broadcast domain. Any compromised device can scan for and reach anything else.
VLANs split that single network into isolated segments. Each VLAN is its own broadcast domain with its own IP range, its own DHCP scope, and its own firewall policy. The access point does the wireless half of the job: it broadcasts multiple SSIDs and tags each one with a VLAN ID (VID) before handing frames to the switch.
A sensible homelab segmentation looks like this:
- Default (Trusted): Personal laptops, phones, admin access to Proxmox and the firewall
- IoT: Smart plugs, cameras, TVs, anything with sketchy firmware and cloud dependencies
- Guest: Internet-only, zero LAN access
- Secure: VPN egress or sensitive services that should never touch the open internet directly
- Homelab: Lab VMs, self-hosted services, Home Assistant
Here’s the important caveat. VLANs are an organization and policy tool, not a security guarantee on their own. They isolate broadcast domains, but a sloppy firewall rule can still expose traffic across segments. VLANs plus a default-deny firewall is the combination that actually protects you.

Choosing Your Access Point: Omada vs UniFi vs Basic
The access point is the piece that makes or breaks wireless VLAN support. Here’s how the realistic options stack up for a homelab.
| Option | VLAN tagging | Controller needed | Best for |
|---|---|---|---|
| TP-Link Omada | Yes, per-SSID on most current models | Optional (local, hardware, or standalone) | One or two APs, best cost-to-feature ratio |
| UniFi (Ubiquiti) | Yes, trunks to UniFi switches work with no manual tagging | Yes (cloud or self-hosted) | Multi-AP houses, fast roaming, one-pane policy |
| Basic consumer AP | None | No | Nothing here. Every client lands in one VLAN |
| Mesh (Deco, Eero) | None or token only | App-based | Simple untrusted Wi-Fi with no segmentation needs |
A few notes on the table. Omada APs let you enable multi-SSID, enable VLAN, and assign a VLAN ID (VID) to each SSID. That’s the whole workflow. It’s what I run, and the EAP610 has been reliable across five SSIDs. UniFi is a full ecosystem where the APs, switches, and gateways are designed to work together, at the cost of a steeper learning curve and a mandatory controller. A plain consumer AP with no VLAN support defeats the entire point of segmentation. And mesh kits are built for simplicity and automatic roaming, so for a homelab where VLAN isolation is the whole reason you’re doing this, mesh is the wrong tool.

The Supporting Cast: Switch, Router, and PoE
The AP can’t do this alone. You need two more pieces.
A Managed Switch
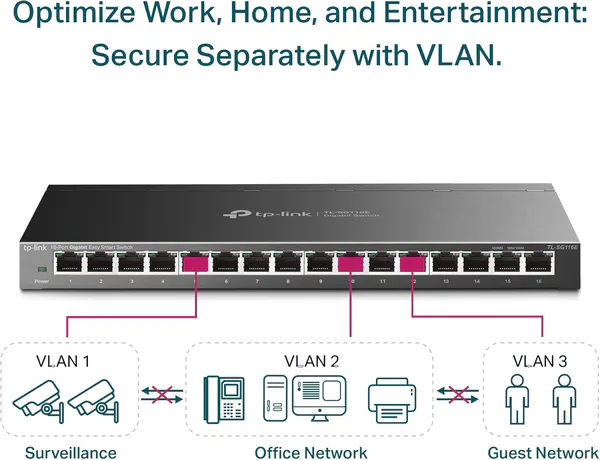
You must have a managed switch that supports 802.1Q VLAN tagging. Unmanaged consumer switches can’t tag frames with VLAN IDs. Good options include the TP-Link Easy Smart line, UniFi switches, and Netgear ProSAFE. An 8-port managed switch runs roughly $50 to $150.
A Router or Firewall for Inter-VLAN Routing
VLANs isolate Layer 2, but something has to route between them and enforce policy at Layer 3. That’s your router or firewall: pfSense, OPNsense, or a UniFi Dream Machine. It creates a logical interface per VLAN tag, runs a DHCP scope per interface, and applies firewall rules per network. An OPNsense VLAN setup on a small mini-PC, or as a VM on Proxmox, handles all of this cleanly.
One tradeoff to understand. Consumer switches often route between VLANs in software, which can throttle inter-VLAN throughput to under 100 Mbps. High-end L3-capable switches offload that routing at line rate. For most homelabs, software routing is fine unless you do heavy cross-VLAN transfers, like frequent VM migrations or large file moves between your lab and NAS.
PoE Budget
If your AP is PoE-powered, check the switch’s PoE budget. A typical AP draws 15 to 30W. A 60W PoE switch can power two to four APs. Add up the wattage of every PoE device (APs plus cameras plus anything else) and confirm the switch can supply it. If you only have one AP and no PoE switch, a single PoE injector works fine. For multiple devices, a PoE switch is far more practical.
Phase 1: Plan Your VLAN Layout Before Touching Hardware
Skipping the planning step is the most common way these projects go sideways. Spend twenty minutes on paper first.
Define your VLANs and assign VIDs. A common scheme:
- VLAN 1: Default
- VLAN 10: IoT
- VLAN 20: Guest
- VLAN 30: Secure
- VLAN 40: Homelab
Map SSIDs to VLANs. For example: “HomeNetwork” to VLAN 1, “IoT-Devices” to VLAN 10, “Guest-WiFi” to VLAN 20, “Secure-VPN” to VLAN 30.
Document IP ranges per VLAN. Keep it predictable: 192.168.1.0/24 for VLAN 1, 192.168.10.0/24 for VLAN 10, 192.168.20.0/24 for VLAN 20, and so on. Matching the third octet to the VID saves you headaches later.
Write a firewall intent checklist. For each VLAN, what does it actually need to reach? Default gets everything. IoT gets internet plus maybe one homelab service. Guest gets internet only. Homelab gets internal services plus internet. Document the cross-VLAN flows you intend to allow, like Homelab reaching IoT on port 8123 for Home Assistant.
Plan your management VLAN if you run OPNsense as a VM on a single-NIC Proxmox host. This one bites people. If your Proxmox box has only one physical NIC, OPNsense runs as a VM behind that same NIC, and a careless trunk change can lock you out of both the firewall and the hypervisor at once. Decide up front which VLAN carries Proxmox and OPNsense management, keep that VLAN reachable from a trusted access port, and never strip its tag from the trunk while you still need it. More on the Proxmox side later.
Prep the boring stuff. Configure an NTP server on the router, identify your DNS resolvers (internal for homelab, public for guest), and write out a port map: which switch port goes to the AP, which to the router, which are access ports for cameras or the NAS. Label your cables as trunk or access before you plug anything in.
Phase 2: Configure the Managed Switch
With the plan written, the switch comes first because everything else trunks through it.
- Create the VLAN IDs. Log into the switch web UI, find the 802.1Q VLAN section, and create VLANs 1, 10, 20, 30, and 40. Label each one clearly.
- Configure trunk ports. Identify the uplink ports: one to the AP, one to the router or firewall. Set both as tagged for all VLANs. Set the PVID to 1, or disable the native VLAN entirely if your switch allows it.
- Configure access ports. Assign every remaining port to its intended VLAN as untagged, with the PVID matching that VLAN. For example, ports 3 and 4 untagged on VLAN 10 (PVID 10) for IoT cameras, ports 5 and 6 untagged on VLAN 40 (PVID 40) for the NAS.
- Save and verify. Save the config, then check the VLAN membership table. Trunk ports should carry all VLANs; access ports should carry only their assigned VLAN. Plug a laptop into an access port and confirm it lands in the right IP range.
The trunk-vs-access distinction is the core concept here. A trunk port carries multiple tagged VLANs and connects switches, APs, and routers. An access port carries one untagged VLAN and connects an end device that knows nothing about VLANs.
Phase 3: Configure the Access Point
Now the wireless half. This example uses a TP-Link Omada AP; UniFi follows the same logic through its controller.
- Connect and access the AP. Plug the AP into your laptop via Ethernet. A standalone Omada EAP610 defaults to DHCP, and falls back to 192.168.0.254 if no DHCP server answers. Set your laptop’s IP to that same subnet (something like 192.168.0.10), then open the AP’s web UI in a browser.
- Enable multi-SSID and VLAN. Go to Wireless then Wireless Settings. Switch the operation mode to Multi-SSID and check Enable VLAN.
- Create SSIDs and assign VIDs. SSID 1 “HomeNetwork” gets VID 1, SSID 2 “IoT-Devices” gets VID 10, SSID 3 “Guest-WiFi” gets VID 20, SSID 4 “Secure-VPN” gets VID 30. Save.
- Set the AP uplink as a trunk. The AP’s uplink port to the switch must be tagged for all VLANs, and it must plug into a trunk port on the switch. Reboot the AP if needed.
- Test wireless association. Connect a phone to “HomeNetwork” and confirm it gets a 192.168.1.x address. Connect another device to “IoT-Devices” and confirm 192.168.10.x. That proves each SSID lands in the right VLAN. Don’t test cross-VLAN isolation yet. Nothing is blocking that traffic until you configure firewall rules in Phase 4.
Phase 4: Configure the Router or Firewall
This is where inter-VLAN routing and policy live. The example uses OPNsense; pfSense is nearly identical.
Create VLAN Interfaces
In the firewall UI, go to Interfaces then Assignments and create a virtual interface for each VLAN tag: em0.1, em0.10, em0.20, em0.30, em0.40. Assign each one a static IP that becomes the gateway for that VLAN, like 192.168.10.1 for VLAN 10.
Enable DHCP per VLAN
Under Services then DHCP Server, enable DHCP on each VLAN interface and set a range, for example 192.168.10.100 to 192.168.10.254. Set DNS servers per interface: an internal resolver for the Homelab VLAN, public DNS for Guest. Scoping DNS per VLAN prevents clients from resolving through the wrong resolver.
Set Static IPs for Servers and VMs
While you’re in the DHCP Server section, handle your fixed-address devices. Homelab services like a NAS or a Home Assistant VM want a stable IP, and you have two clean ways to get one. Use a DHCP reservation on OPNsense, which maps a MAC address to a fixed IP, or set a manual static IP on the device itself, chosen from outside the DHCP range. For example, if your Homelab DHCP pool is 192.168.40.100 to 254, assign your NAS 192.168.40.50 manually. I prefer reservations for VMs because the config lives in one place on the firewall, right next to the DHCP scope from the previous step.
Configure Firewall Rules
This is the part that actually enforces isolation. Follow these golden rules:
- Allow established and related connections so replies flow automatically.
- Deny cross-segment initiation by default.
- Grant “LAN to anywhere” only to the trusted Default network.
- Add explicit allow rules for the specific services you need.
A concrete example: block VLAN 10 (IoT) from initiating any connection to VLAN 40 (Homelab), then add one narrow rule allowing VLAN 40 to reach a specific IoT device on port 8123 for Home Assistant. Block VLAN 20 (Guest) from every internal VLAN while allowing it out to the internet.
Test Routing and Isolation
Now that firewall rules exist, this is the test that was skipped in Phase 3. Connect a device to the Default SSID and try to ping a device on the IoT SSID: it should fail. Ping the router’s IoT interface (192.168.10.1): it should succeed, because gateway access is allowed. Confirm every VLAN has working internet.
Proxmox and OPNsense Integration
Running this on Proxmox adds one wrinkle, because it ties directly into the Proxmox VLAN setup many homelabbers search for.
In Proxmox, create a VLAN-aware Linux bridge. Under Datacenter then your node then System then Network, edit the bridge (usually vmbr0) and check “VLAN aware”. Once the bridge is VLAN-aware, set the VLAN Tag field on each VM’s network device to the VID you want, and the VM inherits that VLAN’s membership. A Home Assistant VM tagged with VID 40 gets an IP from the Homelab DHCP scope automatically.
If you run OPNsense as a VM rather than bare metal, give it two interfaces: one for WAN (untagged, or tagged to your WAN VLAN), and one for LAN connected to the VLAN-aware bridge. OPNsense then handles all inter-VLAN routing and firewall policy for both your physical and virtual machines. The physical switch trunks to the Proxmox host, and every VLAN-aware VM downstream picks up its tag from the bridge.
One more warning if you only have a single physical NIC on the Proxmox host. Both Proxmox management and the OPNsense VM share that one link, so a bad trunk change can cut you off from the hypervisor and the firewall in the same move. This is why Phase 1 told you to plan a management VLAN. Keep that VLAN tagged on the trunk, keep a trusted access port that can reach it, and make trunk changes when you have console access to the Proxmox host as a fallback.
AP Placement: Ceiling vs Desk
Where the AP physically sits affects coverage more than people expect.
Ceiling mount gives better coverage with fewer obstacles between the radio and your devices, and it looks cleaner. It needs PoE or ceiling-run power.
Desk placement is easier for testing and troubleshooting since the AP is right there, but you may get dead zones and visible cable runs.
For a homelab, if you have PoE, mount it on the ceiling. If they sit on a desk or other horizontal surface, make sure a PoE injector or wall outlet is within reach. If you need more than one AP, stagger them across rooms or floors and use the same SSID and VLAN per network so clients roam between them without dropping the connection.
Troubleshooting Common Failures
Most VLAN Wi-Fi problems trace back to a handful of misconfigurations. Here are the ones I’ve hit or watched others hit.
Devices not getting an IP. Check three things in order: DHCP is enabled on the router’s VLAN interface, the DHCP scope has free addresses, and the switch access port PVID matches the device’s VLAN.
Devices landing in the wrong VLAN. Verify the AP’s SSID-to-VID mapping, then check the switch access port PVID. A PVID that doesn’t match the intended VLAN is the single most common cause: frames arriving untagged get stamped with the port’s PVID, so a wrong PVID means a wrong IP range.
Mismatched native VLANs. If two trunk ports have different native VLANs, untagged frames silently land in the wrong segment. The fix is to tag everything and skip the native VLAN where you can.
No internet on a VLAN. Confirm the router has a default route to WAN and that firewall rules permit internet egress from that VLAN.
Slow inter-VLAN traffic. If transfers between VLANs crawl, the switch is probably routing in software. Accept it for a homelab, route through a capable CPU host like your Proxmox box, or buy L3 hardware.
DNS not resolving. Make sure DNS servers are configured on each VLAN interface and that the firewall allows port 53. Verify the client is using the expected resolver with nslookup or dig.
You locked yourself out. If you misconfigure a trunk port and lose connectivity, most switches let you revert to factory defaults or reach the CLI over a serial console. Export your switch and firewall configs at every milestone so you can roll back instead of starting over.
Stale firmware. Older AP and switch firmware sometimes ships VLAN bugs. Update before you rely on the setup in production.
Frequently Asked Questions
➤ Do I need a managed switch to use VLANs?
➤ Can I use a mesh Wi-Fi system like Eero or Deco with VLANs?
➤ What is the difference between a VLAN ID and a PVID?
➤ How do I get a static IP for a Proxmox VM or NAS?
➤ Do VLANs give the same security as physically separate networks?
Wrapping Up
A VLAN-aware wireless setup turns a flat, fragile homelab network into something you can actually trust. The recipe is consistent: a controller-based AP that tags SSIDs to VLANs, a managed 802.1Q switch that trunks them, and an OPNsense or pfSense firewall that routes between VLANs and enforces a default-deny policy. Skip mesh if isolation matters, plan your VLAN layout on paper first, and verify each phase before moving to the next.
Start small. One AP, one managed switch, five VLANs, and a firewall is enough to isolate your IoT junk from your hypervisor. Once that’s stable, you can add APs for roaming, tighten firewall rules per service, and integrate your Proxmox VLAN bridge so VMs land in the right segment automatically.
Next steps: back up your switch and firewall configs, document your final VLAN and IP layout, and if you’re running OPNsense on Proxmox, check our other guides on hardening that firewall VM and on building out the rest of your homelab stack.