If you’re running a homelab on Proxmox and still spinning up full VMs for every little service, you’re burning RAM for no reason.
LXC containers give you near bare-metal performance for a fraction of the overhead. For Pi-hole, Nginx, Jellyfin, Sonarr, or qBittorrent, they sit in the sweet spot between “full VM” and “Docker everywhere.”
Then you try to mount your network share into an LXC. Files show up owned by nobody. Sonarr refuses to move media. Jellyfin logs fill with permission errors.
Don’t ask me how I know. I migrated half my stack from VMs to LXCs to “save resources” without really understanding UID mapping. That afternoon was my crash course in how unprivileged containers actually work.
This guide will save you that afternoon.
We’ll cover:
- When to choose LXC vs VM
- Privileged vs unprivileged containers
- UID/GID mapping basics
- How to mount a network share in Proxmox the right way
- Making mounts persistent across reboots
- Bind mounts vs NFS vs SMB tradeoffs
- Backups, snapshots, and moving containers
- How to move an LXC from external drive to local Proxmox storage safely
When to Use an LXC Instead of a VM
LXC containers use OS-level virtualization. They share the host kernel. That makes them lightweight and fast compared to full VMs.
For most homelab services, LXC is the right call. Use one when:
- You’re running a single service: Pi-hole, Nginx, Jellyfin, qBittorrent, Home Assistant
- You want low RAM overhead and faster startup
- You want tight Proxmox integration and easy
vzdumpbackups
Use a VM when:
- You need Windows
- You need full kernel isolation
- You’re doing GPU passthrough with proprietary drivers
- You want to run a full Docker Compose stack cleanly
Running Docker inside a VM is still the cleanest approach for complex multi-container stacks. Docker inside LXC works, but it adds friction and security tradeoffs you’ll regret the first time something breaks.
One more option worth knowing: Proxmox VE 9.1 introduced native OCI container support, which lets you run Docker-style images without a full Docker VM in some scenarios. Worth exploring if you’re on 9.1 or later.
Privileged vs Unprivileged Containers
This is where most people get burned.
Unprivileged LXC (Default, Recommended)
By default, Proxmox creates unprivileged containers.
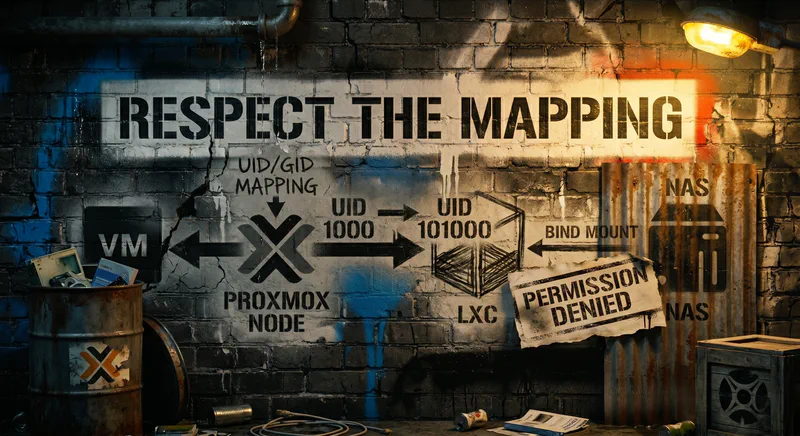
Inside the container, root is UID 0. On the host, that root maps to UID 100000. Container UIDs 0 through 65535 map to host UIDs 100000 through 165535.
This user namespace mapping dramatically improves security. If the container is compromised, the attacker doesn’t get real root on the host. They get a high-numbered unprivileged user that can’t do much.
This is what you want 90% of the time.
Privileged LXC
Privileged containers use real host UIDs. Root inside the container equals root on the host. No UID remapping.
That means fewer permission headaches and sometimes easier hardware passthrough or Docker-in-LXC. It also means weaker isolation and a much bigger blast radius if something goes sideways.
Don’t run privileged unless you have a concrete reason. “It’s easier” is not a concrete reason.
Understanding UID/GID Mapping Without Losing Your Mind
Here’s the core issue.
Inside your LXC, your media app runs as UID 1000. On the host, that same UID 1000 inside the container shows up as UID 101000. The math is simple: 100000 + 1000.
When you bind mount /mnt/media from the host into the container, the container expects to see UID 1000. The host actually sees 101000.
If your NAS files are owned by UID 1000 on the host, the container sees a mismatch. Result: Permission denied, files owned by nobody, and apps that quietly refuse to move or rename anything.
The Safe Default Mapping
Most Proxmox installs use:
lxc.idmap: u 0 100000 65536
lxc.idmap: g 0 100000 65536
Confirm with:
pct config <CTID>
Or test inside the container:
pct exec <CTID> -- id
If you see high-number UIDs on mounted files, the mapping is doing its job. If you see UIDs that look “normal” (under 1000), you’re either looking at a privileged container or a custom idmap. Either way, find out which before you start running chown.
The Right Way to Mount a Synology Drive in Proxmox
This is the most important section if you’re building a media server. Read it twice.
Step 1: Mount Synology on the Proxmox Host
Don’t mount NFS or SMB directly inside the container. Mount on the host.
Mount it on the host first. That gives you one place to manage permissions and makes troubleshooting far easier. If five containers all mount the same share independently, you get to debug five different permission problems.
First, make sure the mount point exists and the right tools are installed.
For NFS (recommended for performance):
apt update
apt install nfs-common
mkdir -p /mnt/synology
mount -t nfs 192.168.1.10:/volume1/media /mnt/synology
For SMB from Synology:
apt update
apt install cifs-utils
mkdir -p /mnt/synology
mount -t cifs //192.168.1.10/media /mnt/synology -o username=user,password=pass,vers=3.0
Verify:
ls -l /mnt/synology
If ownership looks wrong here on the host, fix it before touching the LXC. This single check catches most issues before they spread into the container.
Making Mounts Persistent Across Reboots
Manual mount commands don’t survive a reboot. You need /etc/fstab entries on the Proxmox host.
For NFS:
192.168.1.10:/volume1/media /mnt/synology nfs defaults,_netdev 0 0
For SMB, use a credentials file. Plaintext passwords in /etc/fstab are a bad idea on a system multiple people might log into.
//192.168.1.10/media /mnt/synology cifs credentials=/etc/samba/synology.creds,vers=3.0,_netdev 0 0
Create the credentials file:
mkdir -p /etc/samba
cat > /etc/samba/synology.creds <<'EOF'
username=user
password=yourpassword
EOF
chmod 600 /etc/samba/synology.creds
Then test before rebooting:
umount /mnt/synology
mount /mnt/synology
If it mounts cleanly, you’re set. If it doesn’t, fix it now. A broken fstab entry can stall the host at boot and force you into the rescue console, which is not how you want to spend your evening.
The _netdev flag tells the system to wait for the network before mounting. That matters on Proxmox hosts that finish booting before all interfaces are fully ready.
Step 2: Bind Mount Into LXC
Now bind mount the host path into the container:
pct set <CTID> -mp0 /mnt/synology,mp=/mnt/media,acl=1
A few things to know:
mp0is the first mount point. If you already have anmp0, this overwrites it. Usemp1,mp2, etc. for additional bind mounts.acl=1enables POSIX ACLs on the mount, which most media apps quietly want.- Mount points don’t apply until the container restarts.
Reboot the container:
pct reboot <CTID>
Then check inside:
pct exec <CTID> -- ls -l /mnt/media
If you see UIDs like 101000 or similar, that’s the mapping doing its job. If you see nobody or strange ownership, jump to the next section.
Fixing Permission Denied Errors on NAS Mounts
This is the most common issue with Plex, Jellyfin, and Sonarr. Almost every “my LXC can’t write to my NAS” thread on r/homelab ends here.
Option 1: Adjust Ownership on Host
If your app runs as UID 1000 inside the container, host ownership must be:
100000 + 1000 = 101000
Read the warnings below before running this.
chown -R 101000:101000 /mnt/synology
NFS warning: Whether chown actually does anything depends entirely on your Synology’s NFS export configuration. If the export has root_squash enabled (Synology’s default), the Proxmox host can’t change file ownership on the NAS. The command appears to succeed. The underlying ownership stays exactly where it was. You’ll only notice when you check from another host or from DSM and see nothing changed.
To make chown work over NFS, you need either no_root_squash on the Synology export, or you set anonuid and anongid to the expected host-side UID (101000 in this case). On the Synology, that’s Control Panel > Shared Folder > Edit > NFS Permissions. Check which squash setting is active before you blame Proxmox.
SMB warning: chown does nothing on SMB mounts. Permissions on SMB are controlled by the share configuration on the Synology, not by Linux ownership. Set the Synology user permissions on the share itself.
Option 2: Custom lxc.idmap (Advanced)
Sometimes you need a specific NAS UID to map cleanly into the container. Say your Synology uses UID 1026 for the media user, and you want UID 1026 inside the container to match UID 1026 on the host.
Edit /etc/pve/lxc/<CTID>.conf and add a custom mapping that carves UID 1026 out of the normal offset:
lxc.idmap: u 0 100000 1026
lxc.idmap: u 1026 1026 1
lxc.idmap: u 1027 101027 64509
lxc.idmap: g 0 100000 1026
lxc.idmap: g 1026 1026 1
lxc.idmap: g 1027 101027 64509
This passes UID 1026 through directly. Everything else uses the normal 100000 offset.
You also need to authorize the carved-out UID and GID on the host, or the container will refuse to start. Add these lines to /etc/subuid and /etc/subgid respectively:
root:1026:1
Confirm the default offset on your host before trusting any of this:
grep root /etc/subuid /etc/subgid
You should see something like root:100000:65536. If yours is different, adjust the numbers above to match.
This is genuinely advanced and easy to break. The container won’t even start if the subuid/subgid lines are missing. Unless you have a concrete reason for it, adjusting ownership to match the default mapping is the safer path.
Bind Mount vs NFS vs SMB: What Should You Use?
For media workloads: mount on the host, bind mount into the LXC.
Bind mount on host: Lowest overhead, best performance, single point to manage permissions. This is the right choice for media servers.
NFS directly in container: Possible. Adds network overhead, creates more permission complexity, and is harder to manage centrally. Skip it.
SMB: Higher latency, more permission quirks, more fragile for Linux services. Use it only if NFS isn’t an option on your NAS.
Where Should You Store LXC Root Filesystems?
You can store LXC rootfs on local-lvm, local-zfs, or the boot storage.
Don’t put everything on the boot drive. If your boot drive is also handling heavy media IO, host performance suffers and so does anything else running on it.
A cleaner layout:
- OS on boot SSD
- Containers on a dedicated ZFS pool or SSD-backed storage
- Media on a separate pool or NAS
Keep rootfs small and fast. Put bulk data on larger storage. If you install Proxmox to a USB stick rather than an SSD, pick one that won’t snap off the back of the chassis the first time you bump it.
Backups and Snapshots
One of the biggest advantages of LXC in Proxmox is native backup support. Use it.
Backup
Via GUI: Datacenter > Backup > Add Job. Make sure mount points are included if backup=1 is set on the bind mount. By default, bind mounts are skipped.
CLI:
vzdump <CTID>
Snapshots
pct snapshot <CTID> pre-update --description "Before upgrade"
With ZFS, snapshots are near-instant and cost almost nothing in disk space. Take one before every upgrade. You will eventually need to roll one back, and you’ll be glad you did.
Important: bind-mounted directories are not snapshotted. Your media directory on a NAS won’t be included in a Proxmox snapshot or backup automatically. Plan accordingly. Don’t assume vzdump covers everything, because it won’t.
Troubleshooting Common LXC Storage Issues
1. Files Show as Owned by nobody
Cause: UID mismatch due to unprivileged mapping.
Fix: Adjust host ownership to the mapped UID (typically 101000 for app UID 1000). Check Synology NFS export settings first, specifically root_squash, or your chown will lie to you.
2. Sonarr Cannot Move Files
Cause: Download folder and media folder are owned by different mapped IDs, or they’re on different filesystems entirely (which forces a slow copy and can fail on permissions).
Fix: Ensure both paths are owned by the same UID and GID on the host, and that they live on the same mount when possible.
3. LXC Cannot See Proxmox SMB Share
Cause: SMB mounted inside the container instead of on the host. Or cifs-utils is missing on the host.
Fix: Mount on host. Bind mount into container. Install cifs-utils on the host, not the LXC.
4. High IO or Slow Streaming
Cause: Using SMB instead of NFS. Running heavy IO on the boot pool.
Fix: Switch to NFS. Move container rootfs to a dedicated pool. If transcoding is the bottleneck, a CPU with Quick Sync will offload most of it.
5. Permission Denied After Restore
Cause: Restored to a different host with different UID mapping.
Fix: Verify lxc.idmap lines match the original system. Adjust ownership as needed. This bites people who restore a backup to a fresh Proxmox install and forget that the host UID offsets have to line up.
6. chown Does Nothing on Synology NFS Mount
Cause: Synology NFS export has root_squash enabled. The host can’t change file ownership on the NAS.
Fix: Adjust NFS export settings on the Synology (Control Panel > Shared Folder > NFS Permissions). Use anonuid/anongid to control how the NAS presents ownership to Proxmox, or switch to no_root_squash in a controlled environment. Don’t enable no_root_squash on a share that’s reachable from anything you don’t trust.
Frequently Asked Questions
➤ How do I fix permission denied errors when mounting a Synology NFS share into a Proxmox LXC for Plex or Jellyfin?
root_squash is enabled. If it is, chown won’t change ownership on the NAS side. Set anonuid/anongid on the NFS export, or adjust squash settings on your Synology.➤ Privileged or unprivileged LXC for running Docker inside Proxmox?
➤ Best way to bind mount a ZFS pool or external drive without UID/GID issues?
- Mount on host.
- Use
pct set <CTID> -mpX /host/path,mp=/container/path,acl=1. - Adjust host ownership to match the mapped UID. Check NFS squash settings before you run
chownso you’re not chasing a ghost.
Avoid custom idmap unless you have a specific UID mismatch that can’t be solved by adjusting ownership.
➤ Can I store LXC rootfs on the Proxmox boot drive?
➤ Does Proxmox LXC support snapshots of bind-mounted media directories?
➤ LXC vs VM vs Docker VM for qBittorrent?
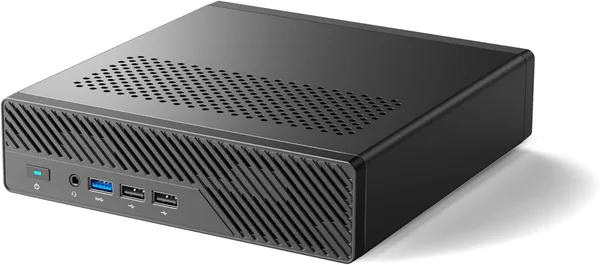
If you’re sizing up new hardware for a Proxmox host that runs a dozen LXCs plus a Docker VM, network and storage I/O matter more than raw clock speed.
Final Thoughts: Mount Network Shares Correctly or Pay for It Later
Proxmox LXC containers are one of the best tools in a homelab. Lightweight, fast, integrated, easy to back up.
But they’re not magic.
The moment you mount a Synology drive in Proxmox or bind mount a ZFS dataset into an LXC, UID and GID mapping becomes real. Ignore NFS squash settings and you’ll spend an afternoon chasing phantom permission errors that aren’t really permission errors at all.
If you remember only three things:
- Use unprivileged containers by default.
- Mount NAS storage on the host, then bind mount into LXC.
- Fix ownership on the host to match mapped UIDs, and check your Synology NFS export settings before you blame Proxmox.
Do that and you’ll skip the wall of errors that ate my afternoon during my VM-to-LXC migration. You don’t need privileged containers and you don’t need custom idmap. You need to understand what the offset does and work with it instead of fighting it.
If you want to go deeper next:
- Explore Proxmox 9.1 OCI containers.
- Learn ZFS dataset tuning for media workloads.
- Build a clean storage layout separating OS, containers, and bulk data.
And if your current box is the bottleneck before you finish reading this, a small Proxmox-friendly node with fast networking will get you further than throwing more RAM at an aging tower.