
How to Rip DVDs and Blu Rays for Your Home Media Server
Step-by-Step Guide to Digitizing Your Physical Media Collection
When you rip your DVDs and Blu-Rays, you can store all your media in one centralized location. No more digging through stacks of discs to find your favorite movie or TV show—you can browse your entire collection digitally from any device connected to your media server. This makes it easy to:
-
Search Quickly: Use metadata like titles, genres, and cast to find movies in seconds.
-
Organize Effectively: Group content by genre, director, year, or any custom structure that suits your style.
-
Stream to Multiple Devices: With media server tools like Jellyfin or Plex, you can access your library on smart TVs, laptops, tablets, and smartphones anywhere in your home—or even remotely.
Physical DVDs and Blu-Rays wear out over time. Discs can get scratched, warped, or lost, putting your movie and show collection at risk. Ripping your discs lets you create digital backups, so you can enjoy your collection for years without worrying about:
-
Scratched Discs: No more frustration when a favorite movie freezes or skips.
-
Storage Challenges: Free up space and avoid clutter by getting rid of bulky disc cases and shelves.
-
Discontinued Titles: Preserve rare or out-of-print movies that might be impossible to replace.
The Process is Simpler Than You Think
If ripping DVDs and Blu-Rays sounds intimidating, don’t worry—you’re not alone. Many people think it’s overly technical or requires advanced computer skills, but with the right tools, it’s surprisingly straightforward.
Today’s software solutions are built for simplicity, often requiring just a few clicks to get started. Tools like MakeMKV and HandBrake are user-friendly, with intuitive interfaces that guide you step by step. You don’t need to be a tech expert—if you can install software and follow basic instructions, you’re good to go.
I’ll walk you through everything you need, from choosing the right hardware and software to organizing and storing your ripped files. And if you run into any challenges, don’t worry—I’ve got tips and troubleshooting advice to help you out. This is a learning process, and with a bit of patience and practice, you’ll feel confident in no time.
By the end of this guide, you’ll see that ripping your DVDs and Blu-Rays is not only doable but also incredibly rewarding. You’ll have a digital library you can enjoy whenever and wherever you want—no more dealing with physical discs. So take it one step at a time, and let’s get started!
What You’ll Need
-
Hardware Requirements
- A DVD/Blu-Ray drive (internal or external).
- OWC Mercury Pro 16X Blu-ray Amazon Link
- A computer with sufficient storage space for the ripped files.
- DVDs about 10GB of free space
- Blu-Ray 1080p about 40GB of free space
- Blu-Ray 4k UHD about 100GB of free space
- Optional: Large external / internal hard drives, or NAS for additional storage.
- WD 20TB Elements Desktop External Hard Drive Amazon Link
- Seagate Exos 20TB Internal Hard Drive Amazon Link
- I’ll have a post about building the media server (NAS) soon.
- A DVD/Blu-Ray drive (internal or external).
-
Software Options
-
MakeMKV: MakeMKV is a simple yet powerful tool for ripping Blu-rays into MKV files. It’s available for both Windows and macOS and focuses on doing one thing really well—no unnecessary features, just straightforward ripping. While MakeMKV technically offers a free 30-day beta trial, there’s a catch: you can either download the latest version each month or use the updated beta key posted in the forums to keep it active. This effectively lets you use the software for free indefinitely. Even though it’s labeled as “beta,” MakeMKV has been in beta for years and shows no signs of changing. For now, there’s no reason to pay for it.
-
HandBrake: When you use MakeMKV to rip a Blu-Ray, it creates an MKV file that’s an exact copy of the movie as it exists on the disc—which often means a file size of 20 to 30GB or more. To make these files smaller and easier to manage, you can use HandBrake to compress them without noticeably losing quality. This step isn’t mandatory, but storing, playing, and streaming such large files can be inefficient and waste resources if smaller, high-quality versions will do the job just as well.
-
Step 1: Rip your DVD / Blu-Ray With MakeMKV
First things first—you’ll need to rip your Blu-Ray to get a digital copy of the movie. MakeMKV is perfect for this because it focuses on one thing: creating a full-size 1080p or 4K MKV file from your Blu-Ray disc. Once the movie is ripped, you’ll have an MKV file that you can shrink, convert, or modify as needed. You can also watch it as-is, but compressing it later is a good idea to save space.
Here’s how to rip your Blu-Ray:
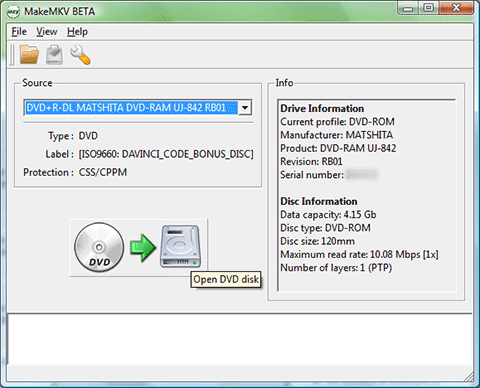
- Insert the DVD or Blu-Ray disc into your Blu-Ray drive.
- Open MakeMKV. After a few moments, you’ll see a large DVD or Blu-ray drive icon appear on the screen.
- Click the icon to begin scanning the titles on your disc.
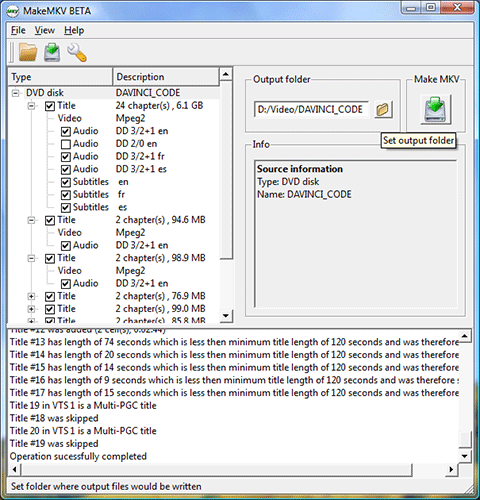
After MakeMKV scans the disc, you’ll see a list of titles on the left. This list includes everything on the disc, like the main movie, special features, deleted scenes, and other extras. If you only want the main movie, look for the largest track—usually around 20–30GB. Select the track(s) you want and leave out the rest. It might take a bit of trial and error to identify the right one, but the largest track is almost always the main movie.
On the right-hand side of the window, choose the folder where you want to save the MKV file. Make sure to pick a hard drive with plenty of space. Although the Info section shows an estimated file size, it’s smart to have at least 20GB of extra space available. Once everything is set, click the Make MKV button (the one with the green arrow) to start the ripping process.
MakeMKV will take about 20 to 30 minutes to rip your movie, depending on your drive speed and the size of the movie. You’ll see a green progress bar showing how far along it is. If you need to stop the rip for any reason, just click the orange stop icon to cancel the process.
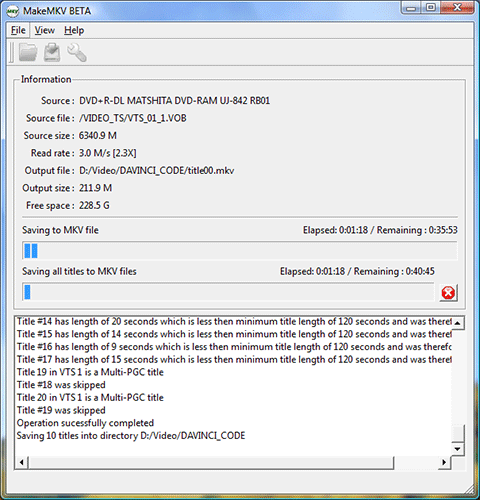
Once the rip is complete, MakeMKV will show a pop-up confirming that it’s finished. You can safely eject the disc and, if needed, insert another one to start a new rip.
At this point, if you’re eager to watch your movie, you can open the MKV file with a media player like VLC, Plex, Kodi, or any other app that supports MKV files. If you’re not worried about saving hard drive space, you’re good to go!
However, if you want a cleaner, more organized, and space-efficient media library, the next step is to compress the file. We’ll cover that in the next section.
Step 2: Compress you Rip to a Manageable Size With Handbrake
Step 2: Compress Your Rip to a Manageable Size with HandBrake
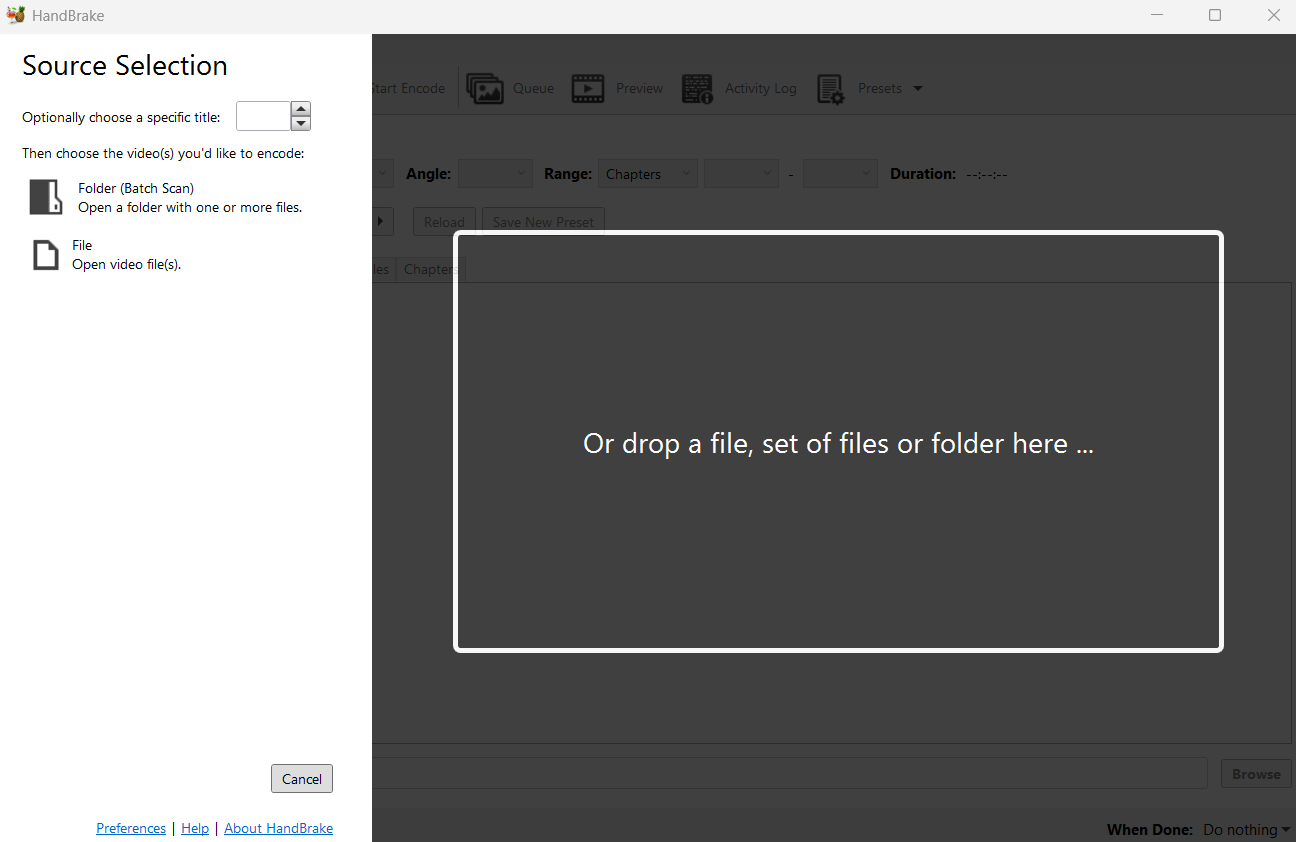
To compress your freshly ripped MKV file, open HandBrake and select File if you’re working on a single video. If you’ve got multiple rips to convert, you can choose Folder (Batch Scan) to scan several files at once. Don’t worry—this step only scans the files and gathers details about them, so it’s safe to select an entire folder containing all your rips. You’ll be able to decide how to convert each file individually later.
For this example, I’m going to keep it simple and drag and drop my new MKV file directly into HandBrake.
Next you will need to select the quality.
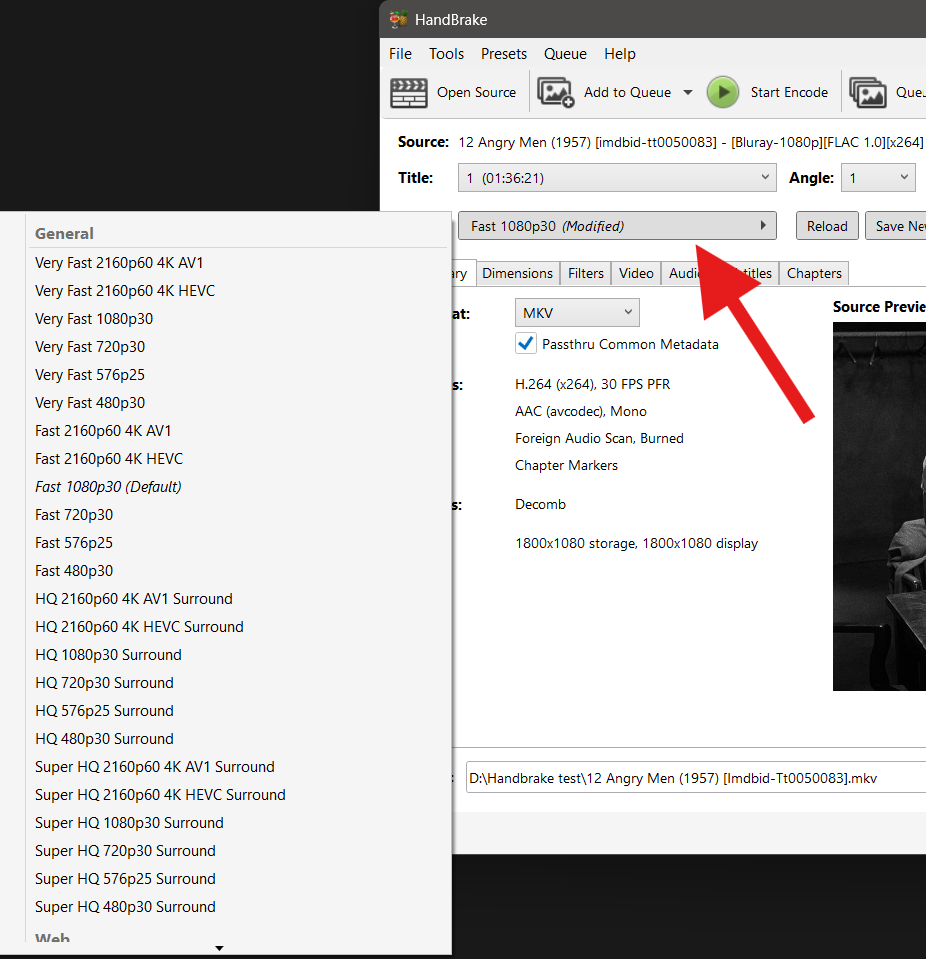
Choosing the Right Quality Settings in HandBrake
Now comes the tricky part: selecting the right quality settings for video compression. HandBrake offers a variety of presets that make it easier to balance video quality and file size. The best preset depends on how much detail you want to keep for each movie. For example:
- For a visually stunning movie like Transformers: Rise of the Beasts, you’ll want to preserve every detail of the robot battles and special effects.
- On the other hand, compressing Monty Python and the Holy Grail won’t lose much since it’s a low-budget comedy, and the humor doesn’t rely on high visual fidelity—those jokes are funny at any resolution!
With that in mind, here are three compression options tailored to different needs:
1. Ultra High Quality, UHD (4K)
- Best for: Movies with detailed special effects, breathtaking visuals, or films where 4K resolution is crucial to the viewing experience.
- Recommended Preset: Super HQ 2160p60 4K HEVC Surround
- This preset keeps the full 4K UHD resolution while compressing the file, significantly reducing its size without any noticeable loss in quality. It’s perfect for action-packed blockbusters, visually rich films, or nature documentaries where every detail counts.
- Audio Tip: To maintain the original high-quality audio, go to the Audio tab and change the codec from “AAC” to “DTS Passthru,” “TrueHD Passthru,” or “AC3 Passthru,” depending on the source audio format. This keeps the audio as crisp and immersive as it was on the original disc.
2. High Quality, High Resolution (1080p)
- Best for: Movies with detailed special effects, beautiful visuals, or films you want to keep looking sharp.
- Recommended Preset: Super HQ 1080p30 Surround
- This preset keeps the full 1080p resolution while significantly reducing the file size without sacrificing much quality. It’s ideal for visually rich movies where you want to maintain detail without the massive file size of a full rip.
- Audio Tip: To preserve the original audio quality, go to the Audio tab and change the codec from “AAC” to “DTS Passthru” or “AC3 Passthru,” depending on the disc’s original audio format.
3. High Quality, Lower Resolution (720p)
- Best for: Movies where visuals aren’t as crucial or older films that don’t really benefit from high-definition resolution.
- Recommended Preset: Super HQ 720p30 Surround or HQ 720p30 Surround
- Dropping from 1080p to 720p may sound like a big downgrade, but the difference is often barely noticeable—especially with a high-quality preset that uses minimal compression.
- This is a great option for comedies, older movies, or films where you’re not worried about preserving every tiny detail. A well-compressed 720p file can look better than an overly compressed 1080p version.
4. Low Quality, Lower Resolution (720p or Below)
- Best for: Movies where saving space is the priority, and video quality isn’t a big concern.
- Recommended Preset: Very Fast 720p30
- This setting drastically reduces file size, making it perfect for your “guilty pleasure” collection or movies you’re not worried about keeping in high quality. It’s the go-to choice when you need to maximize storage space.
What to Consider
- Visual Importance: If the movie relies heavily on visuals (like sci-fi or action films), choose a higher-quality preset to preserve detail.
- Storage Needs: For comedies, older films, or “background” movies, opting for lower resolution or quality presets can save a lot of hard drive space.
- Case-by-Case Flexibility: The best part is you don’t have to use a one-size-fits-all approach. You can adjust the quality settings for each movie based on how much you value its visuals versus how much storage space you want to save.
Using these presets helps you find the right balance between quality and storage, so your media library looks great without wasting space.
For most people, the basic presets will work just fine, delivering a good mix of quality and file size. But if you’re comfortable with advanced settings and want more control, you can tweak options in the Video, Audio, and Subtitles tabs.
For example:
- Video Tab:
- If the preset’s video quality isn’t high enough, adjust the RF (Rate Factor) to a lower value. The default is usually 18, but lowering it to 16 increases quality (at the cost of a larger file size).
- Change the Framerate setting from “30” to “Same as Source” to match the original framerate of your rip for smoother playback.
Don’t hesitate to experiment with these settings to find the perfect balance of quality and file size for your needs!
Choosing the Right Container: MP4 vs. MKV
Under the “Container” setting, you’ll need to choose between MP4 and MKV:
- MKV is more flexible and feature-rich, supporting multiple audio tracks, subtitles, and slightly higher video quality. It’s a great choice for media servers and modern devices that support MKV playback.
- MP4 is more universally compatible, especially with mobile devices like iPhones and iPads, as well as older hardware.
Choose MKV if you want maximum flexibility and quality, or MP4 if you need broader compatibility across different devices.
To decide, check the device you plan to use for playback (There is a table at the bottom of this post with the pros and cons of each ):
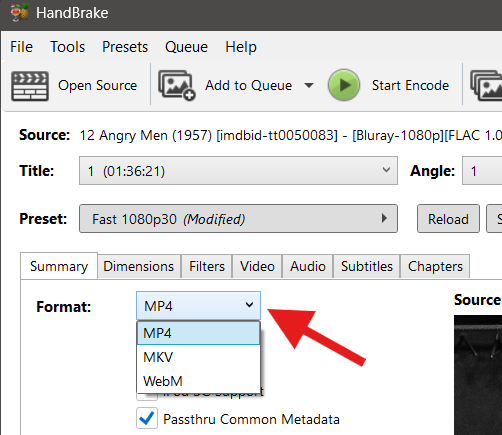
- If your device supports MKV, choose MKV to take advantage of its features and superior quality.
- If MKV isn’t supported, go with MP4 for maximum compatibility across different devices.
Pick the format that best fits your needs.
When you’re ready, click the green Start Encode button to begin the conversion. If you’re working with multiple rips, click Add to Queue after setting up the current video, then move on to the next title. Once you’ve configured presets for all your movies, click the green Start Queue button to process them all at once. This batch processing feature is a huge time-saver if you have several files to convert.
Once your files are done converting, you’ll notice they’re significantly smaller—how much smaller depends on the settings you chose. Make sure to play the converted files to check the quality. If everything looks good, you can safely delete the original rips to free up storage space. Your movies are now ready to be added to your media library, and you can start enjoying your collection!
Comparison Table: MP4 vs. MKV
| Feature | MP4 | MKV |
|---|---|---|
| File Size | Smaller, typically used for compressed files. | Larger, especially when storing lossless, uncompressed rips. |
| Quality | Often compressed, which may result in some loss of quality. | Supports lossless storage, retaining the full quality of video, audio, and subtitles. |
| Audio Tracks | Limited support for multiple audio tracks. | Fully supports multiple audio tracks (e.g., different languages, commentary tracks). |
| Subtitle Support | Limited; embedding multiple subtitle tracks can be tricky. | Excellent support for multiple subtitle tracks, including soft (toggleable) subtitles. |
| Compatibility | Universally supported across most devices and platforms, including older hardware. | Widely supported on modern media players, but not always natively compatible with older devices. |
| Advanced Features | Basic; lacks advanced features like chapter markers and high-end audio codecs. | Supports advanced features like chapters, menus, and high-resolution audio formats (e.g., DTS-HD, Dolby Atmos). |
| Ease of Use | Great for simple playback on most devices without any special configurations. | More feature-rich but may require specific software (e.g., Jellyfin, VLC, or Plex) for optimal playback. |
| Compression | Ideal for compressed files when storage space is limited. | Best for lossless files or preserving full-quality rips of DVDs/Blu-Rays. |
| Future-Proofing | Sufficient for standard-definition or compressed high-definition video. | Better suited for high-resolution formats (e.g., 4K UHD) and high-quality audio codecs. |
| Recommended Use Case | For smaller, portable files or when compatibility with older devices is required. | For archiving DVDs/Blu-Rays or building a high-quality media library. |