Recap: Your Journey So Far
In the previous post, we took your old, dusty computer and gave it a new purpose by turning it into a powerful server running Ubuntu Server 24.04 LTS. We covered:
-
Why starting with an old PC is a smart move—it’s cost-effective, beginner-friendly, and environmentally conscious.
-
The minimum hardware specs needed to run a Jellyfin server, proving you don’t need the latest and greatest hardware to get started.
-
Step-by-step instructions for installing Ubuntu Server—from creating a bootable USB drive to completing the installation process.
With Ubuntu Server installed and ready to go, your old PC has been transformed into a dedicated server. Ready to take on its next task: hosting your own Jellyfin media library. Before we get to Jellyfin, the next step is to add storage drives and set up an SMB share. This will allow you to access your server’s media storage directly from a Windows or other Linux computer, which is essential for tasks like ripping Blu-rays and DVDs using software on a separate machine.
Section 1: Adding Storage to Your Server
Power Off the Server and Add Drives
Step 1: Physically Connect the Storage Drive(s) to Your Server
Power off command:
sudo shutdown -h now
-
For internal drives, install the drive into a free slot and connect it using SATA power and data cables.
-
For external drives, plug it into a USB port (powering off is not necessary).
-
Power on the server to ensure the drive is recognized.
SSH Into Your New Server
Not sure how to use SSH? Refer to this post: Master the Basics - How to SSH Into a Linux Server
Steps to Connect Using SSH
- Open PowerShell on Windows:
The command for SSH:
ssh <username>@<server-ip>
Example From Part 1:
ssh kryptikwurm@172.27.0.200
- Authenticate:
Enter your server password when prompted. (Don’t worry if you don’t see any characters while typing—that’s normal for security reasons.)
Partition and Format the New Drive
Step 2: Check if the Drive is Detected
Use the lsblk command to list all block (storage) devices:
lsblk
Identify the new drive (e.g., /dev/sdb or /dev/sdc) based on its size.
Note the name of the device (e.g., /dev/sdb), as you’ll use it in the next steps
Details on how to partition and format a hard drive in Linux can be found here: Master the Basics - How to Use parted to Create Partitions
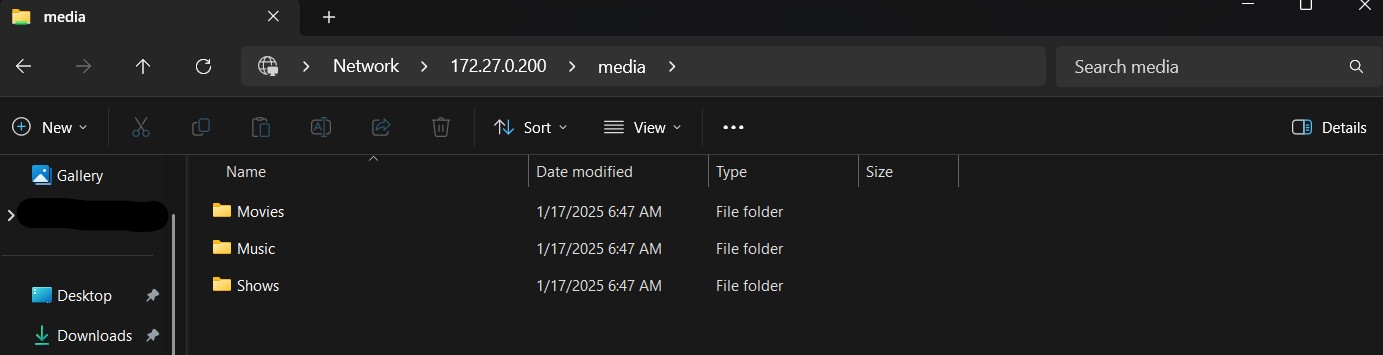
Step 3: Creating the Basic Folder Structure of Your Media Library
As explained in this post your folder structure for Jellyfin should look like this:
    mnt/media/
    ├── Movies/
    ├── Shows/
    └── Music/
To create these folders in the /mnt/media use this command:
sudo mkdir -p /mnt/media/Movies /mnt/media/Shows /mnt/media/Music
To verify this worked:
ls -l /mnt/media
It should look something like this:
drwxr-xr-x 2 root root 4096 Jan 17 13:47 Movies
drwxr-xr-x 2 root root 4096 Jan 17 13:47 Music
drwxr-xr-x 2 root root 4096 Jan 17 13:47 Shows
The permissions of root:root will not work let’s make sure your user has access to these folders.
Change ownership of the folders:
sudo chown -R <username>:<username> /mnt/media
Example:
sudo chown -R kryptikwurm:kryptikwurm /mnt/media
To verify the ownership change worked:
ls -l /mnt/media
It should now look like this:
drwxr-xr-x 2 kryptikwurm kryptikwurm 4096 Jan 17 13:47 Movies
drwxr-xr-x 2 kryptikwurm kryptikwurm 4096 Jan 17 13:47 Music
drwxr-xr-x 2 kryptikwurm kryptikwurm 4096 Jan 17 13:47 Shows
Now grant Read, Write, and Execute to this user:
sudo chmod -R 770 /mnt/media/
To verify the permission change worked:
ls -l /mnt/media
It should now look like this:
drwxrwx--- 2 kryptikwurm kryptikwurm 4096 Jan 17 13:47 Movies
drwxrwx--- 2 kryptikwurm kryptikwurm 4096 Jan 17 13:47 Music
drwxrwx--- 2 kryptikwurm kryptikwurm 4096 Jan 17 13:47 Shows
Section 2: Setting Up SMB (Samba) Shares
Step 1: Install Samba and Nano
To share folders and files between your Linux server and other devices (including Windows systems), you will need Samba. Think of Samba as the bridge that connects different operating systems so they can easily exchange files.
You will also need Nano, a simple and beginner-friendly text editor for Linux. It is perfect for quickly editing configuration files without fuss.
To install both Samba and Nano in one step, run the following command:
sudo apt install samba nano -y
This command tells your server to download and install the required packages automatically. The -y flag saves you a step by confirming the installation for you.
Step 2: Configure the Samba Share
- Open the Samba configuration file for editing:
sudo nano /etc/samba/smb.conf
- Add the following section at the end of the file to define the media share:
    [Media]
    path = /mnt/media
    browseable = yes
    read only = no
    guest ok = no
    valid users = your-username
Save and exit Nano:
- Press
Ctrl+Oto save changes. - Press
Enterto confirm. - Press
Ctrl+Xto exit.
I bet you are thinking ok but, what does this do? let’s break it down:
[Media]
This is the name of the share. When accessing Samba from a client device, this will appear as the share’s name in the network. You can change it to something meaningful for your setup, like [Movies] or [Files].
path = /mnt/media
This specifies the directory on your server that will be shared. In this example, the folder /mnt/media is being shared. Replace /mnt/media with the actual path of the directory you want to share.
browseable = yes
Setting this to yes allows the share to be visible when browsing the network. If set to no, users would need to know the share’s name to access it manually.
read only = no
This allows users to write (add, modify, or delete) files in the share. If set to yes, the share would be read-only, preventing users from making changes.
guest ok = no
This prevents unauthenticated users (guests) from accessing the share. Only users with valid credentials will be allowed access.
valid users = your-username
This restricts access to the share to the specified username. Replace your-username with the actual username you set up on the Ubuntu server. This ensures only authorized users can access the share.
Step 3: Create a Samba User
- Add your server user as a Samba user:
sudo smbpasswd -a your-username
- Follow the prompts to create a password for the Samba user.
Step 4: Restart Samba Service
Restart the Samba service to apply the changes:
sudo systemctl restart smbd
Section 3: Accessing the SMB Share from Another Device
On Windows
- Open File Explorer and type the server’s IP address in the address bar, prefixed with
\\:
\\<server-ip>\<share-name>
Example: \\192.168.1.100\media

- Enter your Samba username and password when prompted.
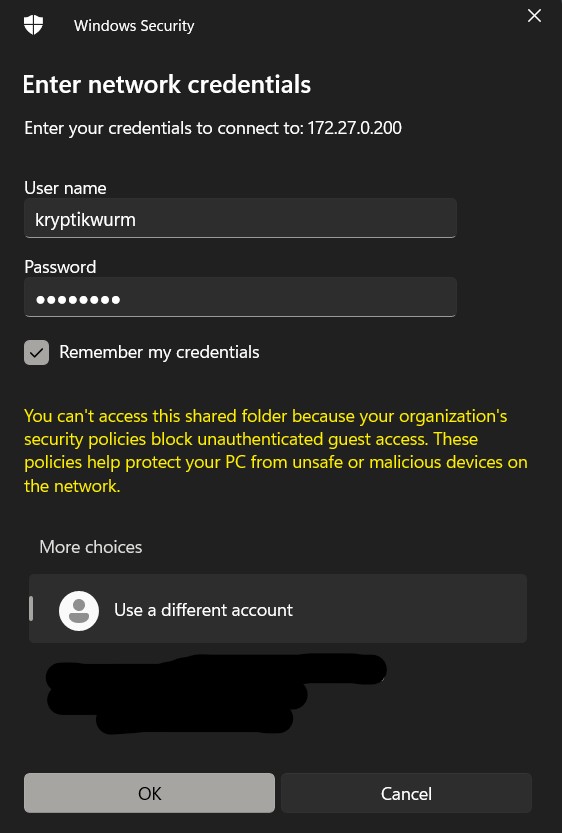
- The shared folder should now be accessible, and you can drag and drop files into it.
On macOS or Linux
-
Open your file manager and choose “Connect to Server” (or a similar option).
-
Enter the SMB address:
smb://<server-ip>/Media
Example: smb://192.168.1.100/Media.
- Log in with your Samba username and password to access the share.
Conclusion
Adding storage to your server and setting up SMB shares might seem daunting at first, but breaking it down step by step makes it totally manageable. By the end of this guide, you’ve learned how to add new drives, set up a structured media library, and share files across devices with Samba. Now, your home media server is well on its way to becoming the ultimate hub for all your digital content.
Remember, this is just the beginning. Every new feature you add builds on what you’ve already accomplished. So, take a moment to celebrate—you’ve just leveled up your tech skills! Keep experimenting, keep learning, and don’t hesitate to reach out with questions.
Now that your storage is ready and accessible, it’s time to bring your media server to life! Head to Part 3 of this series to install Jellyfin and start organizing your collection.